

Kajabi Quick Tip | How to add a countdown timer at the top of your sales page
Feb 06, 2023Welcome to Kajabi Quick Tips, your regular dose of Kajabi inspo.
Twice a week I share an actionable tip that's quick and easy to implement.
Use the step-by-step guide below or watch the video if you prefer to see what's happening on screen.
You'll learn more about Kajabi one quick tip at a time, so you can master the platform that runs your online business!

Just a heads up
Blog Posts from at The Unicorn Advisory may contain affiliate links, but I’m a no bullshit affiliate kinda gal, as you can read about in my affiliate disclaimer.
I only share products and services we use and love and would recommend, if there was affiliate program or not.
The few $$ we make from affiliate income, costs you absolutely nothing and goes straight to our family holiday fund ✈️ so my kids and I thank you💗
Want to add a countdown at the top of your sales page?
Using a countdown timer on your page shows visitors exactly how long they have left to register or buy your product.
It's like a ticker that shows time passing and how long remains.
The great thing is - it's not a time or date, it's the actual number of days, hours, minutes and seconds until your offer closes.
Whilst we can't (yet) add evergreen timers in Kajabi that start when someone first visits the page in Kajabi (you can only do this via third party software) you can add a timer that counts down to a fixed time and date using Kajabi events.
Today I'll show you how to set it up.
Today's KQT
Setting up a countdown timer on your sales page.
Firstly, we need to set up an event, to trigger the timer to work.
So go to marketing > events and add new event.
Usually you'd use events to signify the start time for something such as a webinar or live class.
But when using events for this situation we want to specify the end time of the offer - ie what time it expires.
In your event, set the time for the expiry of you cart.
So if registration closes at 5pm on 9th February, make your event for that time.
Remember to set the time zone as well in case it's different to the timezone you've got Kajabi set to.
You don't need to set up any of the other details for the event, as it's technically not an event, we just need the date and time for the countdown, so none of the other information is necessary - this is like a placeholder.
Once you have your event created, it's time to add it to the page.
Go to the page you'd like to add your event to and add a countdown section.
Move this new section up to the top of the page so we can start styling the section, as it's far too big by default.
First change the countdown block to 5 or 6 columns, do the same with the event block. This will put them next to each other, rather than on top of each other.
Then go to the section settings and adjust the padding for the section to be 0 top and 0 bottom. (Make sure this is the section setting, not the block setting)
You can change the section background colour to your preferred choice as well.
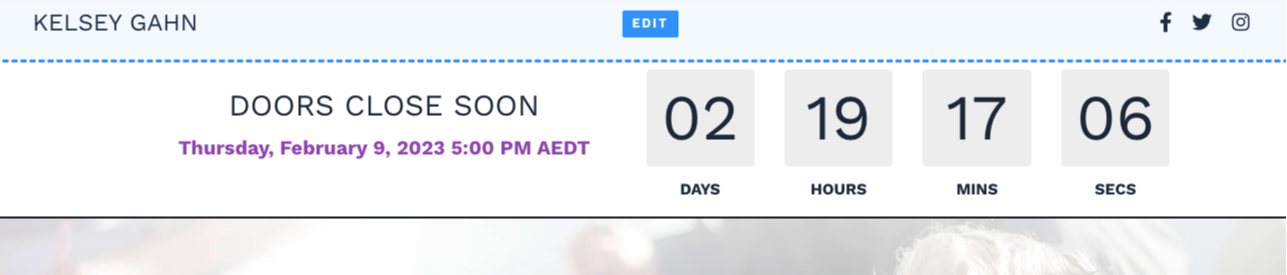
Adjust the wording in the event title to be something simpler, so it all fits on one line, for example DOORS CLOSE SOON.
If you prefer NOT to have the actual date on there you can change that to none in the language settings for the event block.
You can also adjust the design settings of the countdown to suit your preferences and page styling - I go through some options in the video if you'd like to see examples.
You could even get extra tricky and click on the option to remove the section at the completion of the timer, so it will no longer appear! Or even redirect the page to a waiting page - but I will cover that in a future quick tip.
Prefer to watch on video?
View this step-by-step Kajabi Quick Tip on video, if you'd prefer a start-to-finish screen share tutorial.
Want extra Kajabi help?
If you've got Kajabi questions, please let me know what they are. Your question may become a future quick tip or tutorial 👍
Click Here to request a tip
Let's Get Shit Done together!
Are you going to be joining me next weekend for fun, frivolity and most importantly getting your Kajabi to do list DONE?
The next Kajama Party #GSD Weekend is on February 18/19 and registration is now open.
It's a fun chill co-working weekend, that gives you the benefit of a Kajabi expert on hand in case you get stuck while working through your list, or you have questions.
Register for the #GSD weekend >
One Last Thing...
Once you've got the event set up - you can also use it in Kajabi emails.
Just add a countdown section to your email and pick the event you created.
You will need to use something like Sendtric for your checkout page, as Kajabi timers don't work on Kajabi checkouts. Thankfully it's free and easy to add a Sentric timer using HTML and adding the timer to the text area, via the source code. (setting that up will be a future quick tip!)
Hopefully one day soon we'll get timers on checkouts - it is on my Kajabi wishlist!

Cheers, Sue x
Your Trusted Kajabi Expert 🦄
Discover the secrets to using Kajabi like a pro! 🤫
Get a Kajabi Quick Tip in your inbox twice a week
We promise to keep your email and personal info safe. Unsubscribe at any time 🤍